Getting Images into Kindle Books
by Richard Denning
So you have written your masterpiece and want to publish it to Kindle. Maybe you have done what I suggested and first got the manuscript prepared for Smashwords and uploaded it and it was approved so you are happy it all works and looks good.
Smashwords will take your whole document and convert to mobi, edpub etc and include all the images.
That is fine BUT now you want to publish to Kindle and get the book on Amazon. You wont want to just use the Smashwords mobi file as for starters it will have a Smashwords copyright page. It is best to start from the Word doc you got ready for Smashwords and that you know is formatted well.
How to publish on Kindle is covered here BUT in that piece I did not say how to get images into the book.
Reduce File size
When you format the document for smash-words if you follow the style guide it will tell you how to compress your images in Word. This reduces the size of the final e-book file – which is best for fast loading etc.
The DTP issue
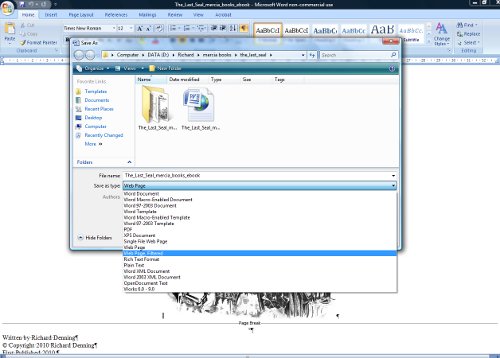
With Kindle DTP you need really to upload a HTML file. The best way to do this is to open Word and click file…save as.. webpage … web filtered
Doing this removes a lot of rubbish WORD code from your book. If you don’t do this you end up with a document for instance with spaces between each line.
BUT when you save as a web page – as a HTML file – the images are stripped out and put in a folder which is referred to by the main HTML file. If you just upload THAT HTML file without the images folder you will find the images dont show up and all you get is little warning icons !!!
The Solution
The answer is to zip up the HTML file and the images and upload that to Kindle DTP.
- Create a folder on your computer. Call it anything you like e.g. myebook.
- Open the word doc of you book (the one you have formatted for Smashwords and then edited ready for Kindle.)
- Save it as a web page filtered and save it INTO that empty folder you created in 1.
- Open the folder and you will find a HTML file called  booktitle.html AND a subfolder called booktitle files.
- Take  look in that book title folder and you will see all the images from your book probably called image01.jpg etc
- What you do is now come out of everything then find that myebook folder. RIGHT CLICK on it and you will get a list of options.
- One of the options is send to. If you select that you will get further options one of which is send to compressed (zipped folder). Select this.
- You should now see a file called booktitle.zip in the same location the myebook folder was in.
- Its THAT zip file that you now upload to Kindle.
- When you have set up your book in Kindle DTP and you get to the bit asking for the book file use THAT zip file.
- To check all is ok open up the preview and you should see images in it. Go ahead and public the e-book
- When the book is setup download the kindle book and check it out.
That’s it.
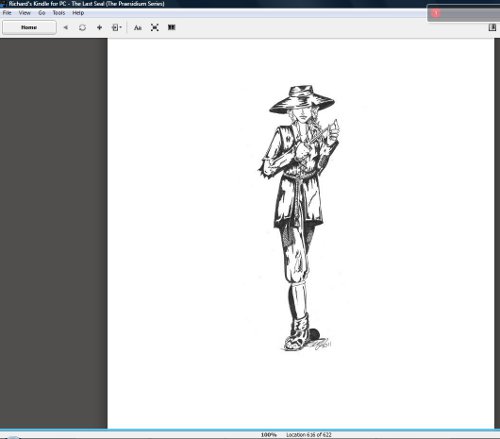
Assuming all goes well you should get a nice greyscale image on your kindle:
I recently followed this procedure to upload my new Kindle version of The Last Seal – my historical fantasy set in the Great Fire of London 1666.
Do me a favour and check out the FREE sample on Kindle.
http://www.amazon.co.uk/dp/B005CC4RSC
http://www.amazon.com/dp/B005CC4RSC


Related Articles
3 users responded in this post
[…] site took a while to find) I thought I would share HOW to make sure your images show up on Kindle. Short guide on how to get images in the book If you are new to making e-books there are a couple of articles about: Publishing E-books […]
Talking of images, do you design your covers yourself Richard?
In the case of the artwork for The Last Seal an Austrian artist called Andreas Resch did the actual images of burning London.
Gill Pearce of Helions Art did the character sketches.
The actual lay out of each cover is done by Cathy Helms of Avalon Graphics. IN the case of Tomorrow’s GUardian and The Amber Treasure that included the actual design of the cover.